Custom Home Building Construction Phases Explained

Have decided you want to build a custom home, but are not sure where to start? We can help answer the tough questions that come along with building your dream custom home.
Building a home is complex and involves many phases. To help you understand the steps involved in building a home, we cover the home building process from beginning to end.
Building a Custom Home: Phase One
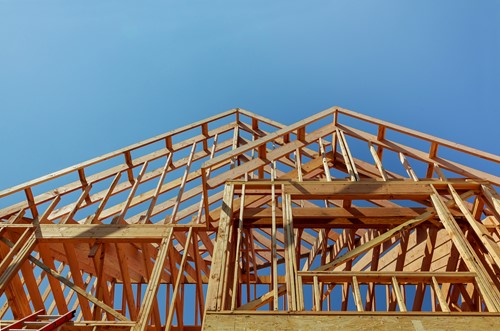
Phase one of building a house is referred to as “rough-in”. The term "rough in" refers to the stage of construction after the basic framing is completed and the mechanical wiring, plumbing, and HVAC installations begin, but before walls and ceilings are closed up. “Rough In” means to bring in the various lines like plumbing pipes, ductwork, and electrical conduit to the site, but not make the final connections.
At this point in the building process, we have either helped you design and draft your new home or you have come to us with a plan already in hand. To begin we,
- Stake your home. First, we need to stake out your home. It is at this point that we pull coordinates and positioning. We also evaluate the elevation. Variables we consider include high sub water, river bed, flood areas, and if the house on a basement.
- Excavation. The excavator digs where the house will lie. This involves the clearing of trees, debris, and leveling the home site for a foundation.
- Footings and Foundation. After the surveyor pins the home corners of the foundation, our team lays out the foundation. It then goes through inspection so we can pour the footings and foundation walls. The foundation is the structure on which the rest of your house is built. Whether it is a concrete slab, a basement, crawl space, or pilings, it needs to be strong and dry.
- Framing. At this stage, we deliver your lumber package and begin framing. This is the stage where the walls, roof trusses, and decking are installed. This stage also includes the windows, exterior doors, and shingles. Most homeowners get excited at this step because they see the house begin to take shape.
- Mechanical Trades. Following framing are the mechanical rough-ins of your new home Plumbing, HVAC, electrical, media wiring, gas, and fireplace installations occur. If on a basement, we will have our plumbers come in and install rough plumbing before framing. If on a slab, rough in happens after framing. Our team delivers a sling truck to pour gravel around the footings and flatwork.
- Dried Roof. Dried roof in (tar paper, vent, etc). to protect the home from weather or rain damage.
- Framing Inspection. After our rough in mechanical work is installed and framing is finished, the home undergoes its second inspection, called the framing inspection.
- Start Exterior Finishes. When the framing, floor systems, and walls are in, also referred to as the shell or skeleton of the home, roof sheathing is added and attic vents are installed. Windows and exterior doors are installed and facade materials such as brick or vinyl are added to exterior walls.
- Insulation. Insulation is added between the studs in all exterior walls and between the joists forming the attic. Gaps between framing and around windows are then sealed to eliminate potential leaks.
- Drywall. Wall and ceiling drywall is installed and finished. Drywall is sometimes called “Sheetrock®.” The drywall is hung (nailed or screwed to the wall studs and ceiling joists), taped (at the joints), and mudded (joint compound applied). Homeowners tend to like this step because rooms are separated and divided, giving you the visual effect of each space.
- Exterior Siding. After drywall has been completed the exterior siding of the home will begin. You will see the brick, stonework, stucco, or whatever your using getting being laid out.
- Exterior Driveway/Walkway. It is at this point that additional exterior finishes like a garage and outdoor walkways are poured with concrete.
Rough in stage is complete. After all of the rough-in process is complete you will meet with the builder at your home to walk through each room and discuss framing and rough-in questions and changes. You will be able to watch the basic structure take shape very fast. Your home will suddenly have walls, a roof, and windows. This is a very exciting time for homebuyers as they will see their home taking shape from the ground up.
Building a Custom Home: Phase Two
In home construction, interior millwork is the interior finish or decorative components phase of your new home construction. When you are absolutely certain that everything has been roughed-in properly, it is time to finish the walls, install the doors & trim, hang the cabinets, put down the hardwood flooring, install tile, and more! Interior doors, trim, and shelving are installed, and paint is applied. All other materials, including cabinets, counter-tops, mirrors, and flooring are installed too. Please refer to our buyers guide for interior design details. Lastly, HVAC, plumbing, and electrical are finished, light fixtures and appliances go in, and you are ready for move in!
Details on each step of phase two of the home building process are explained below. They include interior and exterior finishes:
- Wall texture. Determine if you want smooth or rough walls, bullnose or knife nose edges, etc.
- Interior Trim. Guardian finishes installing interior wood trim and other decorative wood finishes like base case headers, crown molding, shiplap, wainscoting, etc. This phase also includes installing interior doors.
- Flooring. As your interior finishes are installed, simultaneously, we will install hard-surface flooring. This includes tile and grout floor.
- Cabinets. Phase two also consists of installing cabinets you selected throughout the kitchen and bathrooms in your new home. We also install your built-in cabinets during this step.
- Interior paint. Another exciting time of the homebuilding process is when the inside of your house will be painted. Drywall will get its final coats of paint and trim will also be painted with the colors you selected. At this point, you are able to see what rooms will really look like.
- Hardwood floors. After the painting is complete, hardwood floors are installed throughout the home. Hardwood floors are not installed until after painting and other interior finishes are complete to avoid scratching or other damages.
- Touch ups. The team conducts a walk-through and finalizes any painting or interior touch-ups.
- Countertops. The countertops you selected are installed throughout the house. Choose from granite, concrete, marble, quartz, or a wide variety of options. With Guardian Homes, customizations are endless.
- Mechanical Trim Out. This phase will include the completion of your plumbing fixtures, lighting fixtures, HVAC, electrical trim, and shower doors. All units are hooked up including tubs, toilets, gas lines, etc. Light switches, other fixtures, and hardware are installed.
- Appliances. Appliances are added to your home - including refrigerator, stove, and any other additional appliances you selected. Select from an endless option of appliances and add-ons for your custom-built Guardian Home.
- Landscaping. One of the last steps to tie your new home together is landscaping. Your yard is graded, sod and mulch are laid out, flowers and trees are plated, etc.
- Quality Inspection. At the final stage of construction, we will perform a final clean-up and schedule a walk-through with you. We will discuss and review every area of your home to make sure everything is functioning properly and that you are happy with the project.
Building a Custom Home: Phase Three
Your new Guardian Built home is ready for you to move in and enjoy for many years to come!
- Closing.
- Move-In!
The Guardian Team has decades of combined building experience. We know the ins and outs of building a home, making the process easy for you! Please contact our custom home builders in Park City or Idaho Falls to begin drafting or building your dream home.